Gear
WINTER ULTRA SEASON IS KICKING INTO HIGH GEAR. HERE ARE SOME SUGGESTIONS FOR TOOLS AND GEAR TO CARRY FOR A SUCCESSFUL FAT BIKE RACE, OR JUST A LONG FATPACKING TRIP.
Fat bike racing distances vary considerably, and the winter temps, along with snow and ice present some unique needs.
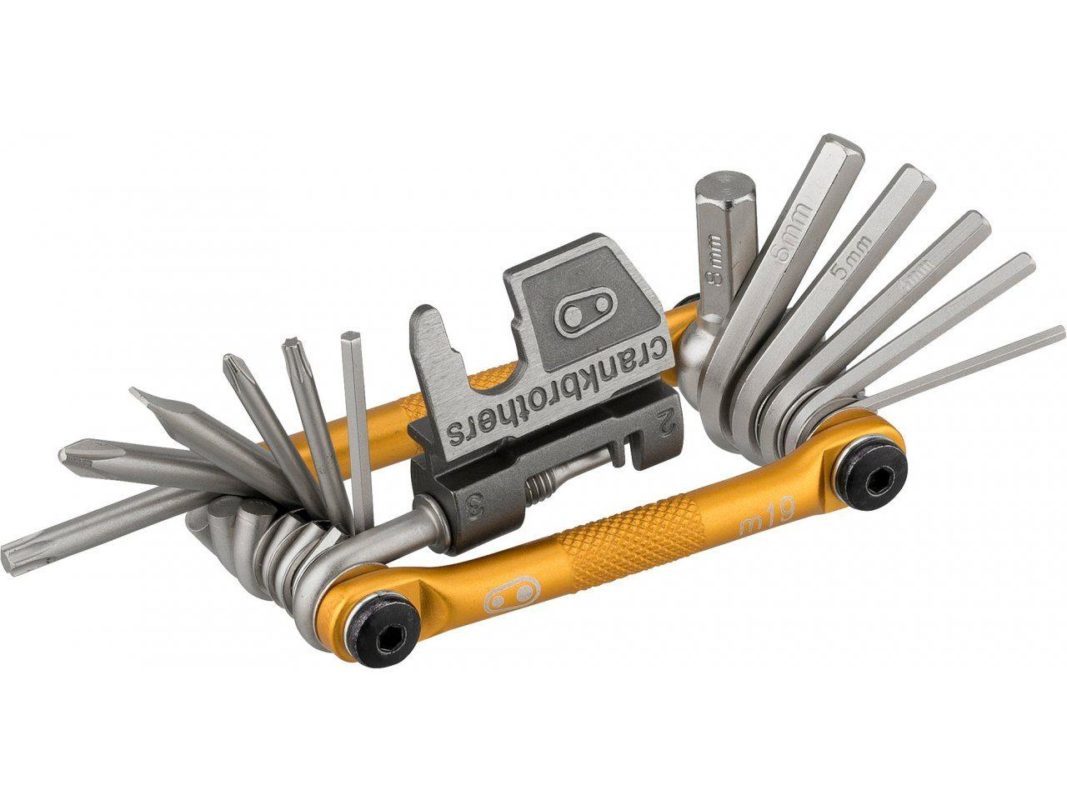
The first thing I look for in a multi-tool are little pieces that might fall into the snow, never to be seen again. Steer clear of the inspector gadget tools for that reason. Generally speaking, I always recommend multi-tools with built in chain tools. If you break a chain, carrying a spare quick link won’t solve the problem unless it was your quick link that broke in the first place, which rarely happens. You’ll need to remove the splayed outer plates to add another quick link. The chain tools on a multi tool don’t have much leverage, but they get the job done. My favorite multi-tool, summer or winter is the Crank Bros Multi 19. It’s inexpensive (about $30), fairly slim, but also long enough to apply the torque needed in most cases. With few exceptions, you can assemble or disassemble a bike with the Multi 19. Be aware it will rust near salt water.

Lezyne also makes some well thought out tools. I’d steer clear of the smaller/lighter versions and go for the more usable size RAP 20.

Next up is a sweet little set of chain link pliers which house a pair of quick links in a magnetic holder. If you have ever fumbled around in a frame bag in the dark searching for quick links, you’ll know how nice these are. I used to tape a quick link to my derailleur cable, but with these pliers, I know exactly where they are. The pliers also have a valve core tool and a tire lever. They weigh nothing and are about 1/4″ x 1″ x 4″ long. If you are doing the Trio this year, you get a limited edition laser etched set as swag!

Next up, mini pumps. I would chose a pump based on weather conditions. If it’s clear and cold, and trails are firm, the trail is most likely to be consistent, and you can get away with a smaller pump. If conditions are iffy, and you might be airing up and down, or the race is multi-day, carry a larger pump. I don’t recommend CO2’s. They are great when every second counts, but in a 100mi+ race, unnecessary. My current recommendation is the Topeak Mountain TT. It moves an incredible volume of air for it’s size using a dual stroke design. I prefer pumps with slip on valve heads rather than the screw on variety. The main reason for this is the screw on type can unscrew the valve core upon removal. I can tell you from experience it’s not particularly fun to deal with when it’s -10. You can prevent this for the most part by tightening the valve cores (the little “Y” opening on the Wolftooth tool above is for that very purpose), but it’s not a problem at all with the press on type of pump. The cheaper version Mountain TT has no gauge, and is about $30. Built in gauges don’t work particularly well, especially at the lower pressures we use, so no justification for them. If you want a gauge, carry either an analog or digital gauge. With a little practice, you won’t need a gauge to know what pressure you have. Just go by feel.

The pump I carried in the ITI, Susitna 100, and White Mountains 100 was the Topeak Mountain Morph. This is a fantastic pump, and features a small “foot” you can stand on, as well as a T handle. It’s on the large end of mini pumps, but I highly recommend them.

Make sure to carry a tube, and while you are at it, it’s not a bad idea to have a spare valve stem, or at the very least a spare core, as they can break off when removing pump heads if you aren’t careful.
The last item of the post is about hydration. My first rule of hydration is to blow back through the hose until you hear bubbles, every time you drink. The second rule is to use a drink mix with plenty of electrolytes and calories. Use this in your longer training sessions so your body is used to it. I have found they all work, but some are more palatable than others. Many believe you should only get your calories from food. Having spent roughly 40yrs racing, I can say for certain it’s easier to drink than eat. I’ve talked with experienced racers that still make that same mistake. “I went out too hard and just forgot to eat, and all I had was water.” Eat! It’s one of many great things about cycling! I eat real food. No gels or bars needed. Those are quick energy/quick digestion for extremely high output events. Most of the time in the longer events you’ll be riding at tempo pace or slower, so you can digest most anything. Pizza is a fav. If you take a drink every 15-20 min, you’ll be certain the hose will not freeze, or if it does, it will be a quick thaw. Many people make the mistake of thinking they don’t need as much fluid in winter. This is incorrect. Your body uses quite a bit to keep your respiratory system moist. And while I’m on the subject, if you are sweating, you are wasting energy trying to cool down, sort of like driving a car with the windows down and the heat on. I tend to run hot, so it’s a bit of a tightrope to stay the right temp without at least a little sweating, but keep it manageable.
So, back to hydration. I always use 3L bladders (or even larger on occasion). You don’t have to fill them all the way if there are many aid stations, but you have the ability to carry more if needed. I prefer hoses without insulation. Use your clothing for insulation. The problem with the insulated versions is you can’t see where they are frozen. If they do freeze, slip the entire hose between your back and the pack and it will thaw within minutes. This is a virtually fool proof method, one I have used countless times. It is always the fluid in the hose that freezes, not the bladder. I also avoid hose valves with 90 degree bends, as this is probably the first place liquid will freeze if you forget to blow back through the hose. If your’s has one, you can usually slip off the bite valve and place it directly on the hose. I have used both over the shoulder and under, and both work fine. I use a pack I had made specifically for these events back in 2009. It’s as simple as it gets and comes without a belt. It’s just a bladder sleeve, with a mesh pouch on the back. It’s made slim to fit under whatever jacket you wear and only weighs 1/2lb. We have these on sale right now for $40.


Hope that helps! Best of luck in your adventures!